Bell & Ross – Vintage 123 – ETA 2895-2
Martin dropped off his gorgeous Bell & Ross watch last week because it was losing a lot of time. A whole 3 minutes per day. Also, the last time it was cleaned was a good 6 years ago, so, it was time.
Great looking, isn’t it?
[pe2-image src=”https://lh3.googleusercontent.com/-ka9qmUTGAY8/VwP9sMuYxMI/AAAAAAAARa0/BLJbbD6XBEoaMDSM3pJJ8TKr42Q1PrYSQCHM/s144-o/Watchtyme-Bell%2526Ross-Vintage-123_05_04_2016-01.JPG” href=”https://picasaweb.google.com/100026384290156470746/BellRossVintage123ETA28952#6270134042001720514″ caption=”” type=”image” alt=”Watchtyme-Bell&Ross-Vintage-123_05_04_2016-01.JPG” pe2_img_align=”left” ]
[pe2-image src=”https://lh3.googleusercontent.com/-tzvgHmLGyGo/VwP9sLYY3BI/AAAAAAAARa0/t93fAmBZEsky7HLUyX4EPoskuGVkAOhMACHM/s144-o/Watchtyme-Bell%2526Ross-Vintage-123_05_04_2016-02.JPG” href=”https://picasaweb.google.com/100026384290156470746/BellRossVintage123ETA28952#6270134041641016338″ caption=”” type=”image” alt=”Watchtyme-Bell&Ross-Vintage-123_05_04_2016-02.JPG” pe2_img_align=”left” ]
Very interesting case back. It’s obviously a screw on case back, but, with a twist. The outer part of the case back screws onto the case, but, there’s a separate center piece that has a shoulder which the sits under the screw-on back.
The center piece also has a small crystal so you can check out the ETA 2895-2’s balance.
[pe2-image src=”https://lh3.googleusercontent.com/-WRb5IppVmzI/VwP9sMIfspI/AAAAAAAARZI/7p5qTM3UVFU-Q-PPEzwhhB-bReef_JxHQCHM/s144-o/Watchtyme-Bell%2526Ross-Vintage-123_05_04_2016-03.JPG” href=”https://picasaweb.google.com/100026384290156470746/BellRossVintage123ETA28952#6270134041842791058″ caption=”” type=”image” alt=”Watchtyme-Bell&Ross-Vintage-123_05_04_2016-03.JPG” pe2_img_align=”left” ]
[pe2-image src=”https://lh3.googleusercontent.com/-SYCDGlzRmoE/VwP9tIfXVqI/AAAAAAAARa0/gJ31QyujGTohLEnLH6uJ2kZzwncHuEpHgCHM/s144-o/Watchtyme-Bell%2526Ross-Vintage-123_05_04_2016-04.JPG” href=”https://picasaweb.google.com/100026384290156470746/BellRossVintage123ETA28952#6270134058044839586″ caption=”” type=”image” alt=”Watchtyme-Bell&Ross-Vintage-123_05_04_2016-04.JPG” pe2_img_align=”left” ]
Very well Bell & Ross logo engraving on the rotor.
[pe2-image src=”https://lh3.googleusercontent.com/-fNB9M7o2hmQ/VwP9tM7-iXI/AAAAAAAARa0/_ERz8HcoqfAD83M0KBg6BV1ccWc_-L_yACHM/s144-o/Watchtyme-Bell%2526Ross-Vintage-123_05_04_2016-05.JPG” href=”https://picasaweb.google.com/100026384290156470746/BellRossVintage123ETA28952#6270134059238590834″ caption=”” type=”image” alt=”Watchtyme-Bell&Ross-Vintage-123_05_04_2016-05.JPG” ]
With the movement out of the case, it’s time to start getting my hands dirty. But, I really like this very clean looking dial.
[pe2-image src=”https://lh3.googleusercontent.com/-FsmObcXQGRE/VwP9uI_6mcI/AAAAAAAARa0/-uJYD0wjkrEluxytb_zeCnFrLtq5lNOdACHM/s144-o/Watchtyme-Bell%2526Ross-Vintage-123_05_04_2016-06.JPG” href=”https://picasaweb.google.com/100026384290156470746/BellRossVintage123ETA28952#6270134075361237442″ caption=”” type=”image” alt=”Watchtyme-Bell&Ross-Vintage-123_05_04_2016-06.JPG” ]
Pretty identical to the ETA 2892 movement. In fact, they’re the exact same except the seconds hand at 6 o’clock. I admit, I have never worked on a 2895 before, so, I did a little research on this particular movement. And, the feedback that I got back, is that most people are not too impressed with how they modified the 2892 instead of creating a new movement altogether. And, after taking it apart and putting it together, I must say, I agree. I’ll go into further detail lower down.
[pe2-image src=”https://lh3.googleusercontent.com/-iGSSo9tiO3M/VwP9uY-qzTI/AAAAAAAARa0/voD5jxITIfcFwfVsPrHSovgdJq7GGla6gCHM/s144-o/Watchtyme-Bell%2526Ross-Vintage-123_05_04_2016-07.JPG” href=”https://picasaweb.google.com/100026384290156470746/BellRossVintage123ETA28952#6270134079650975026″ caption=”” type=”image” alt=”Watchtyme-Bell&Ross-Vintage-123_05_04_2016-07.JPG” ]
So, I start off by removing the bridge on the dial side, exposing pretty much the only difference between the 2892 and the 2895. Long story short, the escape wheel has a shaft that goes through the main plate and this drives the 3 wheels that you see off-center, which then drives the seconds hand.
[pe2-image src=”https://lh3.googleusercontent.com/-kzNCK0STwGk/VwP9ujlKM5I/AAAAAAAARa0/vogscF6h61w1HM-Uj8B0zEHh3QEi_eCNgCHM/s144-o/Watchtyme-Bell%2526Ross-Vintage-123_05_04_2016-08.JPG” href=”https://picasaweb.google.com/100026384290156470746/BellRossVintage123ETA28952#6270134082496770962″ caption=”” type=”image” alt=”Watchtyme-Bell&Ross-Vintage-123_05_04_2016-08.JPG” pe2_img_align=”left” ]
[pe2-image src=”https://lh3.googleusercontent.com/-1Pq7TQsCL28/VwP9u13K58I/AAAAAAAARa0/eXBi5xZCRAkDsPWXcN8vIV0lmV1eivU7gCHM/s144-o/Watchtyme-Bell%2526Ross-Vintage-123_05_04_2016-09.JPG” href=”https://picasaweb.google.com/100026384290156470746/BellRossVintage123ETA28952#6270134087404152770″ caption=”” type=”image” alt=”Watchtyme-Bell&Ross-Vintage-123_05_04_2016-09.JPG” pe2_img_align=”left” ]
Here, I have removed the keyless, motion and calendar works components.
[pe2-image src=”https://lh3.googleusercontent.com/-DsNOGGPYcYg/VwP9vVCNOLI/AAAAAAAARa0/QklusZ1hLQslySIrn9dD7svf-1GtRBvTACHM/s144-o/Watchtyme-Bell%2526Ross-Vintage-123_05_04_2016-10.JPG” href=”https://picasaweb.google.com/100026384290156470746/BellRossVintage123ETA28952#6270134095771941042″ caption=”” type=”image” alt=”Watchtyme-Bell&Ross-Vintage-123_05_04_2016-10.JPG” ]
I apologize, I didn’t take more pictures while dismantling the movement, however, I did take more putting everything together.
Here, the movement went through the cleaning machine and waiting to be put back together.
[pe2-image src=”https://lh3.googleusercontent.com/-veqmRyzrf5E/VwP9vVZBQvI/AAAAAAAARa0/MzhH-AA_Jq8sgm18M8JZVEzeQYh-JvrtgCHM/s144-o/Watchtyme-Bell%2526Ross-Vintage-123_05_04_2016-11.JPG” href=”https://picasaweb.google.com/100026384290156470746/BellRossVintage123ETA28952#6270134095867626226″ caption=”” type=”image” alt=”Watchtyme-Bell&Ross-Vintage-123_05_04_2016-11.JPG” ]
As usual, I start off by applying breaking grease to the barrel wall, treating the escape wheel and pallets with epilame and treating the reverser gear with Lubeta V-105.
[pe2-image src=”https://lh3.googleusercontent.com/-xn3SgUXaqSo/VwP9vwkvCYI/AAAAAAAARa0/3vZCc8jkB2IblgGCWj81YwQcxZ-M7PCNwCHM/s144-o/Watchtyme-Bell%2526Ross-Vintage-123_05_04_2016-12.JPG” href=”https://picasaweb.google.com/100026384290156470746/BellRossVintage123ETA28952#6270134103164520834″ caption=”” type=”image” alt=”Watchtyme-Bell&Ross-Vintage-123_05_04_2016-12.JPG” ]
Having done that, it’s time to put the mainspring back into the barrel. For the ETA 2892 – 2895, you need a special Bergeon mainspring winder. If you don’t use the proper one, you can easily stretch the eye of the mainspring.
[pe2-image src=”https://lh3.googleusercontent.com/-kyKRm8D1bfY/VwP9wR0I-1I/AAAAAAAARa0/sidA8y2bDK4AjOktqIhujC2POAqPH75TgCHM/s144-o/Watchtyme-Bell%2526Ross-Vintage-123_05_04_2016-13.JPG” href=”https://picasaweb.google.com/100026384290156470746/BellRossVintage123ETA28952#6270134112087505746″ caption=”” type=”image” alt=”Watchtyme-Bell&Ross-Vintage-123_05_04_2016-13.JPG” ]
Next, I need to install the crown, ratchet and intermediate wheel, along with click spring to the barrel bridge.
[pe2-image src=”https://lh3.googleusercontent.com/-A-fHM_xIjEM/VwP9xGGQIWI/AAAAAAAARa0/wUv4-JPkIIstKIgWB9fzG7ShipYGV2-awCHM/s144-o/Watchtyme-Bell%2526Ross-Vintage-123_05_04_2016-14.JPG” href=”https://picasaweb.google.com/100026384290156470746/BellRossVintage123ETA28952#6270134126122115426″ caption=”” type=”image” alt=”Watchtyme-Bell&Ross-Vintage-123_05_04_2016-14.JPG” ]
Here, I start off with installing the barrel and barrel bridge.
[pe2-image src=”https://lh3.googleusercontent.com/-zvZVreaj9xI/VwP9wwXnmAI/AAAAAAAARa0/8dKCG6JtWvguYfv_U_8gzqAF6HZUiHJVgCHM/s144-o/Watchtyme-Bell%2526Ross-Vintage-123_05_04_2016-15.JPG” href=”https://picasaweb.google.com/100026384290156470746/BellRossVintage123ETA28952#6270134120289376258″ caption=”” type=”image” alt=”Watchtyme-Bell&Ross-Vintage-123_05_04_2016-15.JPG” ]
Then, I turn the movement over and install the keyless works.
[pe2-image src=”https://lh3.googleusercontent.com/-s45qA4jtCnE/VwP9x3wiwAI/AAAAAAAARa0/veY_Vj41UR4Bd79UG4XeeR-8bWObhInDQCHM/s144-o/Watchtyme-Bell%2526Ross-Vintage-123_05_04_2016-16.JPG” href=”https://picasaweb.google.com/100026384290156470746/BellRossVintage123ETA28952#6270134139452833794″ caption=”” type=”image” alt=”Watchtyme-Bell&Ross-Vintage-123_05_04_2016-16.JPG” ]
Again, I turn the movement over and start installing the gear train.
Most often, an escape wheel’s pivots go into the mainplate jewel and bridge jewel. However, because ETA decided to use the 2892 movement and modify it to facilitate a seconds hand at six, they elongated the escape wheel so it runs through the mainplate, and the pivot goes into an added bridge on the dial side.
With this particular movement, I used the technical document, which pretty much gives you a step-by-step guide. It was definitely not a well written document. The escape wheel, like I mentioned is elongated. And, both ends are not identical. One end is shaped like a sphere, whereas the other end is just round. If you’re a watch repairer, make sure you put spherical side down.
[pe2-image src=”https://lh3.googleusercontent.com/-wEYj4qXER2Q/VwP9xmaCz8I/AAAAAAAARa0/g8l9iciH8G8_F2J13XJOY6w6SiBljhWHQCHM/s144-o/Watchtyme-Bell%2526Ross-Vintage-123_05_04_2016-17.JPG” href=”https://picasaweb.google.com/100026384290156470746/BellRossVintage123ETA28952#6270134134795063234″ caption=”” type=”image” alt=”Watchtyme-Bell&Ross-Vintage-123_05_04_2016-17.JPG” ]
Next, I turn the movement over and start assembling the motion and calendar works.
[pe2-image src=”https://lh3.googleusercontent.com/-8ddSjNg8ZJc/VwP9x9pJvwI/AAAAAAAARa0/fiDRJ_-Atl8THoMJVyouggsyYs_EuZxbwCHM/s144-o/Watchtyme-Bell%2526Ross-Vintage-123_05_04_2016-18.JPG” href=”https://picasaweb.google.com/100026384290156470746/BellRossVintage123ETA28952#6270134141032447746″ caption=”” type=”image” alt=”Watchtyme-Bell&Ross-Vintage-123_05_04_2016-18.JPG” ]
Here’s that bridge I was mentioning that the escape wheel pivots into.
[pe2-image src=”https://lh3.googleusercontent.com/-I1yF7IpU9UY/VwP9ynOcdWI/AAAAAAAARa0/4TegdaBPQsIpUQwCrE2pa61C-stH-m4bQCHM/s144-o/Watchtyme-Bell%2526Ross-Vintage-123_05_04_2016-19.JPG” href=”https://picasaweb.google.com/100026384290156470746/BellRossVintage123ETA28952#6270134152194717026″ caption=”” type=”image” alt=”Watchtyme-Bell&Ross-Vintage-123_05_04_2016-19.JPG” ]
With the escape wheel locked into place, I can now regulate the watch, which, came out quite nicely.
[pe2-image src=”https://lh3.googleusercontent.com/-ZDV5a3rjzUQ/VwP9yy7ahZI/AAAAAAAARa0/Xoxj2iJZcTcGnrAwAqOJFoelXK1DAdUygCHM/s144-o/Watchtyme-Bell%2526Ross-Vintage-123_05_04_2016-20.JPG” href=”https://picasaweb.google.com/100026384290156470746/BellRossVintage123ETA28952#6270134155336123794″ caption=”” type=”image” alt=”Watchtyme-Bell&Ross-Vintage-123_05_04_2016-20.JPG” ]
After regulating the movement, I turn it over and install the oscillating weight and it’s bridge.
[pe2-image src=”https://lh3.googleusercontent.com/-BoIq-LfdDhs/VwP9z27sP0I/AAAAAAAARbU/5XsbXMMN4CE2AzfzOJGKgzc9B6hn3rgBACHM/s144-o/Watchtyme-Bell%2526Ross-Vintage-123_05_04_2016-21.JPG” href=”https://picasaweb.google.com/100026384290156470746/BellRossVintage123ETA28952#6270134173590896450″ caption=”” type=”image” alt=”Watchtyme-Bell&Ross-Vintage-123_05_04_2016-21.JPG” ]
Again, I turn the movement over, and finish off with installing the gears that runs off the escape wheel pinion that has the right number of teeth so it can turn 60 times in 60 seconds, and in turn turns the seconds hand. It’s pretty cool actually how they did that, however, just very tricky to work on.
[pe2-image src=”https://lh3.googleusercontent.com/-Bw0kG1GTj6Q/VwP9zcdUHBI/AAAAAAAARa0/7MWN9rhSK3AU_ZqOhR2718i-j9YdgYgcgCHM/s144-o/Watchtyme-Bell%2526Ross-Vintage-123_05_04_2016-22.JPG” href=”https://picasaweb.google.com/100026384290156470746/BellRossVintage123ETA28952#6270134166484163602″ caption=”” type=”image” alt=”Watchtyme-Bell&Ross-Vintage-123_05_04_2016-22.JPG” ]
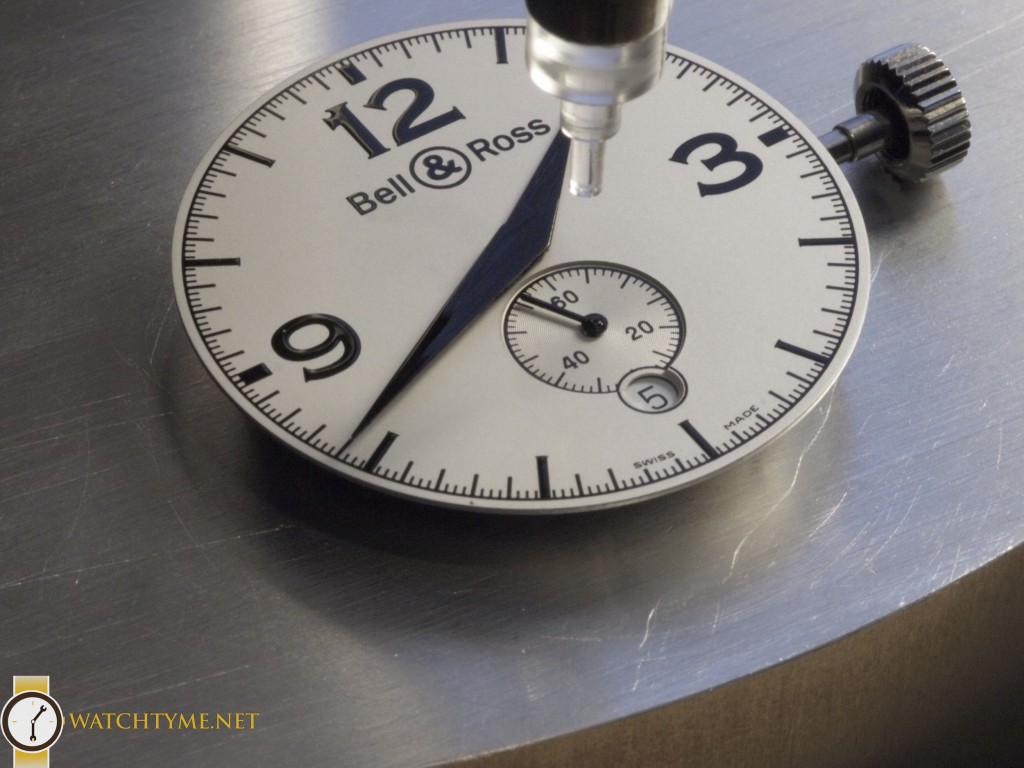
Time to put the really pretty dial and hands 🙂
[pe2-image src=”https://lh3.googleusercontent.com/-NKIEt3fyAnk/VwP9zhKa_uI/AAAAAAAARbU/hNQt2fnKuOUcNaVdzBWq05J2colh59UHACHM/s144-o/Watchtyme-Bell%2526Ross-Vintage-123_05_04_2016-23.JPG” href=”https://picasaweb.google.com/100026384290156470746/BellRossVintage123ETA28952#6270134167747100386″ caption=”” type=”image” alt=”Watchtyme-Bell&Ross-Vintage-123_05_04_2016-23.JPG” pe2_img_align=”left” ]
[pe2-image src=”https://lh3.googleusercontent.com/-L5PaSwVxLmI/VwP90YyKg8I/AAAAAAAARbU/oHNf0eHivLA6wfJxVlh8S7G9M5p1rXH6wCHM/s144-o/Watchtyme-Bell%2526Ross-Vintage-123_05_04_2016-24.JPG” href=”https://picasaweb.google.com/100026384290156470746/BellRossVintage123ETA28952#6270134182677742530″ caption=”” type=”image” alt=”Watchtyme-Bell&Ross-Vintage-123_05_04_2016-24.JPG” pe2_img_align=”left” ]
And, last but not least, case it up.
[pe2-image src=”https://lh3.googleusercontent.com/-pHW89ZYa1kM/VwP912QfEcI/AAAAAAAARbU/zdX0RlAGvzYVfppDcCMh71MnrZ1jMnKRwCHM/s144-o/Watchtyme-Bell%2526Ross-Vintage-123_05_04_2016-25.JPG” href=”https://picasaweb.google.com/100026384290156470746/BellRossVintage123ETA28952#6270134207769416130″ caption=”” type=”image” alt=”Watchtyme-Bell&Ross-Vintage-123_05_04_2016-25.JPG” pe2_img_align=”left” ]
[pe2-image src=”https://lh3.googleusercontent.com/-EQtFQsaiWBY/VwP90jiZQtI/AAAAAAAARbU/HI_9yruK_fEm_DAJ3yu9D09Vuign3qCQwCHM/s144-o/Watchtyme-Bell%2526Ross-Vintage-123_05_04_2016-26.JPG” href=”https://picasaweb.google.com/100026384290156470746/BellRossVintage123ETA28952#6270134185564390098″ caption=”” type=”image” alt=”Watchtyme-Bell&Ross-Vintage-123_05_04_2016-26.JPG” pe2_img_align=”left” ]
[pe2-image src=”https://lh3.googleusercontent.com/-H9Bo9l5Qs6c/VwP91Yd2j3I/AAAAAAAARbU/Y6bUsIo8yUIQA5SpDurNr3pxTZVopyeWgCHM/s144-o/Watchtyme-Bell%2526Ross-Vintage-123_05_04_2016-27.JPG” href=”https://picasaweb.google.com/100026384290156470746/BellRossVintage123ETA28952#6270134199772417906″ caption=”” type=”image” alt=”Watchtyme-Bell&Ross-Vintage-123_05_04_2016-27.JPG” pe2_img_align=”left” ]
Thank you for viewing my latest post, hope you enjoyed it.
Chris
Thanks for the great pictures!
My pleasure. I really enjoy stopping and taking pictures as I go along. As a repairer, I also find it satisfying to
to look at them.