Omega Seamaster – Cal. 565
Hey there 🙂
Nick recently dropped off a few watches including this Omega Seamaster. When unscrewing the case back and having a quick look, I quickly realized this movement has never once been touched. The screws were brand new, not even the slightest mark. Cross referencing the serial number on the movement, this movement was made in the early 70’s. So, great buy Nick 🙂
Anyway, let’s get started.
[pe2-image src=”https://lh3.googleusercontent.com/-H23AijeE0AI/Vw1Ld5xG5BI/AAAAAAAARpI/5Cuh6lHBO7wIUQVfb-alx6GMODXzyFttACHM/s144-o/Watchtyme-Omega-Seamaster-Car565_12_04_2016-01.JPG” href=”https://picasaweb.google.com/100026384290156470746/OmegaSeamasterCal565#6272752833092051986″ caption=”” type=”image” alt=”Watchtyme-Omega-Seamaster-Car565_12_04_2016-01.JPG” ]
[pe2-image src=”https://lh3.googleusercontent.com/-EL4MFtRU4GI/Vw1Ld-CHypI/AAAAAAAARpI/OsV11N8sGM8wxegMGX4RQzXCRSZ1aigKwCHM/s144-o/Watchtyme-Omega-Seamaster-Car565_12_04_2016-02.JPG” href=”https://picasaweb.google.com/100026384290156470746/OmegaSeamasterCal565#6272752834237155986″ caption=”” type=”image” alt=”Watchtyme-Omega-Seamaster-Car565_12_04_2016-02.JPG” ]
After fully winding the movement, I put it on my timegrapher.
[pe2-image src=”https://lh3.googleusercontent.com/-kTzELdwc8yc/Vw1Ld3XWhgI/AAAAAAAARpI/LhEe81f2nIoPsu7apkKU6SZ_EQ9PLXcXQCHM/s144-o/Watchtyme-Omega-Seamaster-Car565_12_04_2016-03.JPG” href=”https://picasaweb.google.com/100026384290156470746/OmegaSeamasterCal565#6272752832447153666″ caption=”” type=”image” alt=”Watchtyme-Omega-Seamaster-Car565_12_04_2016-03.JPG” ]
With the movement out of the case, with the dial and hands off.
[pe2-image src=”https://lh3.googleusercontent.com/-P0z6tRTRP5g/Vw1LekyPtnI/AAAAAAAARpI/MVOLJQ7xgtEsaWg-GYT-5qdZAMN9nfnBwCHM/s144-o/Watchtyme-Omega-Seamaster-Car565_12_04_2016-04.JPG” href=”https://picasaweb.google.com/100026384290156470746/OmegaSeamasterCal565#6272752844639549042″ caption=”” type=”image” alt=”Watchtyme-Omega-Seamaster-Car565_12_04_2016-04.JPG” ]
I quickly turn the movement over and remove the automatic rotor off.
[pe2-image src=”https://lh3.googleusercontent.com/-tcWT48xKhg8/Vw1Le3OFRzI/AAAAAAAARpI/2_k8SyI-LBkTL95Nak48stukKGwUXxX-wCHM/s144-o/Watchtyme-Omega-Seamaster-Car565_12_04_2016-05.JPG” href=”https://picasaweb.google.com/100026384290156470746/OmegaSeamasterCal565#6272752849588143922″ caption=”” type=”image” alt=”Watchtyme-Omega-Seamaster-Car565_12_04_2016-05.JPG” ]
And again, I turn the movement over and start disassembling the calendar works.
[pe2-image src=”https://lh3.googleusercontent.com/-3jSyiep3GTA/Vw1Le8_pF1I/AAAAAAAARpI/w_KA2btMa_EWvFV3rnPI5Z94xJqdwmFAgCHM/s144-o/Watchtyme-Omega-Seamaster-Car565_12_04_2016-06.JPG” href=”https://picasaweb.google.com/100026384290156470746/OmegaSeamasterCal565#6272752851138189138″ caption=”” type=”image” alt=”Watchtyme-Omega-Seamaster-Car565_12_04_2016-06.JPG” pe2_img_align=”left” ]
[pe2-image src=”https://lh3.googleusercontent.com/-2kFZN0TNQ_Q/Vw1LfdnHCkI/AAAAAAAARpA/N0xuVTAv4EwY0pg5LzR0nEotA_aH4ZRTQCHM/s144-o/Watchtyme-Omega-Seamaster-Car565_12_04_2016-07.JPG” href=”https://picasaweb.google.com/100026384290156470746/OmegaSeamasterCal565#6272752859893664322″ caption=”” type=”image” alt=”Watchtyme-Omega-Seamaster-Car565_12_04_2016-07.JPG” pe2_img_align=”left” ]
Again, I turn the movement over to the bridge side and commence disassembling the crown, ratchet wheels along with the click.
[pe2-image src=”https://lh3.googleusercontent.com/-ZLCwX-XeW1E/Vw1Lf05dhxI/AAAAAAAARpA/RZxAJ2QKAkkD0D_mL3NXKx1wQEeHwUAMQCHM/s144-o/Watchtyme-Omega-Seamaster-Car565_12_04_2016-08.JPG” href=”https://picasaweb.google.com/100026384290156470746/OmegaSeamasterCal565#6272752866144651026″ caption=”” type=”image” alt=”Watchtyme-Omega-Seamaster-Car565_12_04_2016-08.JPG” ]
Next, I remove the gear train bridge.
[pe2-image src=”https://lh3.googleusercontent.com/-sYaU7WUUtls/Vw1LfzqRd3I/AAAAAAAARpA/WeY30NQteBEYPL_HKL-qr0k7JXMuDexjwCHM/s144-o/Watchtyme-Omega-Seamaster-Car565_12_04_2016-09.JPG” href=”https://picasaweb.google.com/100026384290156470746/OmegaSeamasterCal565#6272752865812510578″ caption=”” type=”image” alt=”Watchtyme-Omega-Seamaster-Car565_12_04_2016-09.JPG” ]
Clearly, I didn’t take any pictures of removing the barrel bridge and barrel. But 🙂 , I did turn the movement over again and start removing the keyless and motion works.
[pe2-image src=”https://lh3.googleusercontent.com/-ZN9tnaO74GY/Vw1LgPULW5I/AAAAAAAARpA/jxz6AaSH36EAfc-euHL_EbohtkOkh6SigCHM/s144-o/Watchtyme-Omega-Seamaster-Car565_12_04_2016-10.JPG” href=”https://picasaweb.google.com/100026384290156470746/OmegaSeamasterCal565#6272752873236028306″ caption=”” type=”image” alt=”Watchtyme-Omega-Seamaster-Car565_12_04_2016-10.JPG” ]
Here’s the barrel.
[pe2-image src=”https://lh3.googleusercontent.com/-8-t9u6UIpoc/Vw1LgVEgoMI/AAAAAAAARpA/vrQfPSDXfT0l5VguaTq8pijAm_eNNPS5QCHM/s144-o/Watchtyme-Omega-Seamaster-Car565_12_04_2016-11.JPG” href=”https://picasaweb.google.com/100026384290156470746/OmegaSeamasterCal565#6272752874780926146″ caption=”” type=”image” alt=”Watchtyme-Omega-Seamaster-Car565_12_04_2016-11.JPG” ]
[pe2-image src=”https://lh3.googleusercontent.com/-FZk4ILR74bE/Vw1LhsHERRI/AAAAAAAARpA/fd2wvQL9s6s6u1-caPxeIr7dpmRjUMwmwCHM/s144-o/Watchtyme-Omega-Seamaster-Car565_12_04_2016-15.JPG” href=”https://picasaweb.google.com/100026384290156470746/OmegaSeamasterCal565#6272752898145535250″ caption=”” type=”image” alt=”Watchtyme-Omega-Seamaster-Car565_12_04_2016-15.JPG” ]
And, last but not least, time to start taking apart automatic rotor from the automatic bridge.
[pe2-image src=”https://lh3.googleusercontent.com/-0-Ls23YpA44/Vw1Lgyb3m_I/AAAAAAAARpA/1Hpzs_YKNF4DdBX8JxzyGxcbqwIOCuwmgCHM/s144-o/Watchtyme-Omega-Seamaster-Car565_12_04_2016-12.JPG” href=”https://picasaweb.google.com/100026384290156470746/OmegaSeamasterCal565#6272752882663529458″ caption=”” type=”image” alt=”Watchtyme-Omega-Seamaster-Car565_12_04_2016-12.JPG” pe2_img_align=”left” ]
[pe2-image src=”https://lh3.googleusercontent.com/-NHho_tVaFEA/Vw1LhGQk55I/AAAAAAAARpA/ZiAytIF-KU0D3YRF-S3WAgqtnBBdALhvgCHM/s144-o/Watchtyme-Omega-Seamaster-Car565_12_04_2016-13.JPG” href=”https://picasaweb.google.com/100026384290156470746/OmegaSeamasterCal565#6272752887984875410″ caption=”” type=”image” alt=”Watchtyme-Omega-Seamaster-Car565_12_04_2016-13.JPG” pe2_img_align=”left” ]
With the whole movement cleaned, it’s time to start putting everything together.
[pe2-image src=”https://lh3.googleusercontent.com/-qHFpaovzcbc/Vw1LhWt-RbI/AAAAAAAARpA/xE1qCwnG6ls7uC0lw-_AgsA61Y3R1VwnwCHM/s144-o/Watchtyme-Omega-Seamaster-Car565_12_04_2016-14.JPG” href=”https://picasaweb.google.com/100026384290156470746/OmegaSeamasterCal565#6272752892403140018″ caption=”” type=”image” alt=”Watchtyme-Omega-Seamaster-Car565_12_04_2016-14.JPG” ]
New mainspring.
[pe2-image src=”https://lh3.googleusercontent.com/-FZk4ILR74bE/Vw1LhsHERRI/AAAAAAAARpA/fd2wvQL9s6s6u1-caPxeIr7dpmRjUMwmwCHM/s144-o/Watchtyme-Omega-Seamaster-Car565_12_04_2016-15.JPG” href=”https://picasaweb.google.com/100026384290156470746/OmegaSeamasterCal565#6272752898145535250″ caption=”” type=”image” alt=”Watchtyme-Omega-Seamaster-Car565_12_04_2016-15.JPG” ]
I start off with installing the barrel and centre wheel.
[pe2-image src=”https://lh3.googleusercontent.com/-OiOsPmkWCuw/Vw1Lh287w-I/AAAAAAAARpA/T9YbVROZcTQzyqE-uiYQTTxLs8CxhIfJACHM/s144-o/Watchtyme-Omega-Seamaster-Car565_12_04_2016-16.JPG” href=”https://picasaweb.google.com/100026384290156470746/OmegaSeamasterCal565#6272752901055824866″ caption=”” type=”image” alt=”Watchtyme-Omega-Seamaster-Car565_12_04_2016-16.JPG” ]
Then, I install the gear train and both the gear train bridge and barrel bridges.
[pe2-image src=”https://lh3.googleusercontent.com/-jTga5TIx9yg/Vw1Lie18pmI/AAAAAAAARpA/bjuwXJMPOyc3o2l7SlO7nIUUUcGX5OFZgCHM/s144-o/Watchtyme-Omega-Seamaster-Car565_12_04_2016-17.JPG” href=”https://picasaweb.google.com/100026384290156470746/OmegaSeamasterCal565#6272752911763940962″ caption=”” type=”image” alt=”Watchtyme-Omega-Seamaster-Car565_12_04_2016-17.JPG” ]
Followed by installing the ratchet and crown wheels along with the click.
[pe2-image src=”https://lh3.googleusercontent.com/-SXAHuKmzCjI/Vw1Lir1XwHI/AAAAAAAARpA/KRIA9H54tBgCBJgI_n3l4OF3_U05VhLZgCHM/s144-o/Watchtyme-Omega-Seamaster-Car565_12_04_2016-18.JPG” href=”https://picasaweb.google.com/100026384290156470746/OmegaSeamasterCal565#6272752915251183730″ caption=”” type=”image” alt=”Watchtyme-Omega-Seamaster-Car565_12_04_2016-18.JPG” ]
And, the pallets and pallet cock.
[pe2-image src=”https://lh3.googleusercontent.com/-7Md2iDeiZGo/Vw1LimQV-jI/AAAAAAAARpA/aw3UxKQDQCIltOFfxjfRQk4EtUoAlDX7QCHM/s144-o/Watchtyme-Omega-Seamaster-Car565_12_04_2016-19.JPG” href=”https://picasaweb.google.com/100026384290156470746/OmegaSeamasterCal565#6272752913753700914″ caption=”” type=”image” alt=”Watchtyme-Omega-Seamaster-Car565_12_04_2016-19.JPG” ]
Next, I turn the movement over and get started on the keyless and motion works.
[pe2-image src=”https://lh3.googleusercontent.com/-TN88Yjhe6yA/Vw1LjIAMEkI/AAAAAAAARpA/LpD-Y7EdGg8w_Vac15hg5Zd-15v0P8FGgCHM/s144-o/Watchtyme-Omega-Seamaster-Car565_12_04_2016-20.JPG” href=”https://picasaweb.google.com/100026384290156470746/OmegaSeamasterCal565#6272752922812748354″ caption=”” type=”image” alt=”Watchtyme-Omega-Seamaster-Car565_12_04_2016-20.JPG” pe2_img_align=”left” ]
[pe2-image src=”https://lh3.googleusercontent.com/-KonyaMpQHMo/Vw1LjcidpNI/AAAAAAAARpA/CDsr4XhFeLYgAc1oEf82TbH0ppPfV2avQCHM/s144-o/Watchtyme-Omega-Seamaster-Car565_12_04_2016-21.JPG” href=”https://picasaweb.google.com/100026384290156470746/OmegaSeamasterCal565#6272752928325215442″ caption=”” type=”image” alt=”Watchtyme-Omega-Seamaster-Car565_12_04_2016-21.JPG” pe2_img_align=”left” ]
Then, time to regulate the movement on the timegrapher. Pretty nice improvement.
[pe2-image src=”https://lh3.googleusercontent.com/-akPgumgK7-w/Vw1LjmVRVvI/AAAAAAAARpA/rQlHt_nwGQwhWhEDxSXBr4mVrmijVpCFQCHM/s144-o/Watchtyme-Omega-Seamaster-Car565_12_04_2016-22.JPG” href=”https://picasaweb.google.com/100026384290156470746/OmegaSeamasterCal565#6272752930954237682″ caption=”” type=”image” alt=”Watchtyme-Omega-Seamaster-Car565_12_04_2016-22.JPG” ]
Here’s a couple of pics with the automatic gear train installed.
[pe2-image src=”https://lh3.googleusercontent.com/-TjJGHkR9eNI/Vw1Lj1S_dxI/AAAAAAAARpA/ieyciGskCMEQI0AOk9ZKsErkG08KUQLQQCHM/s144-o/Watchtyme-Omega-Seamaster-Car565_12_04_2016-23.JPG” href=”https://picasaweb.google.com/100026384290156470746/OmegaSeamasterCal565#6272752934971209490″ caption=”” type=”image” alt=”Watchtyme-Omega-Seamaster-Car565_12_04_2016-23.JPG” pe2_img_align=”left” ]
[pe2-image src=”https://lh3.googleusercontent.com/-cJ4FrwqGNGk/Vw1LkYxuh0I/AAAAAAAARpA/TbTVR0joY-UzCaoHGpu1XgeOmtGqp0k9wCHM/s144-o/Watchtyme-Omega-Seamaster-Car565_12_04_2016-24.JPG” href=”https://picasaweb.google.com/100026384290156470746/OmegaSeamasterCal565#6272752944495363906″ caption=”” type=”image” alt=”Watchtyme-Omega-Seamaster-Car565_12_04_2016-24.JPG” pe2_img_align=”left” ]
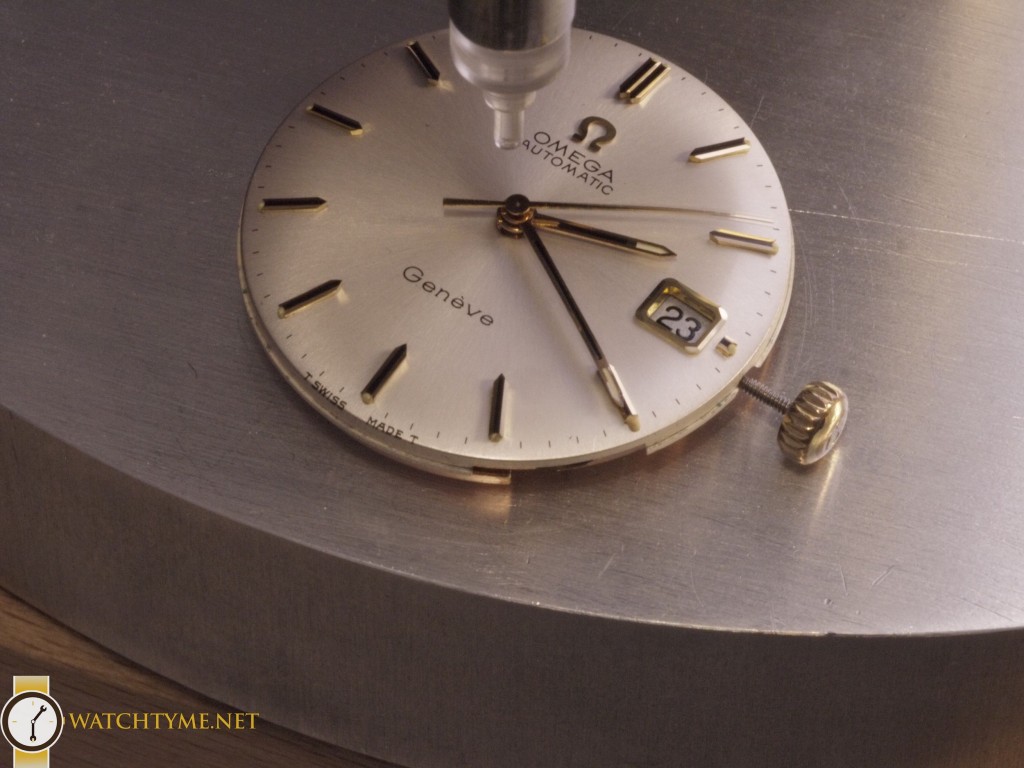
And, time to install the dial and hands.
[pe2-image src=”https://lh3.googleusercontent.com/-guEWWxxEkjw/Vw1LkYSUzBI/AAAAAAAARpA/0I1Yzve1cvALA4VqN4geAuAWmP2b845nACHM/s144-o/Watchtyme-Omega-Seamaster-Car565_12_04_2016-25.JPG” href=”https://picasaweb.google.com/100026384290156470746/OmegaSeamasterCal565#6272752944363654162″ caption=”” type=”image” alt=”Watchtyme-Omega-Seamaster-Car565_12_04_2016-25.JPG” ]
Last but not least, I install the movement into the case along with a new gasket.
[pe2-image src=”https://lh3.googleusercontent.com/-9Ju6YN5Cb7s/Vw1Lkr3I8yI/AAAAAAAARpA/oREcT-DVJ8s9pVUFMp6gMx-mE5N-xEf6wCHM/s144-o/Watchtyme-Omega-Seamaster-Car565_12_04_2016-26.JPG” href=”https://picasaweb.google.com/100026384290156470746/OmegaSeamasterCal565#6272752949618340642″ caption=”” type=”image” alt=”Watchtyme-Omega-Seamaster-Car565_12_04_2016-26.JPG” ]
As every watch I work on, I certainly enjoyed it. I hope you did!
Cheers
Chris
Hi Chris, would you be so kind to share a photo album with larger pictures?
Hi
you can always check out my Google + page. I believe the images may be larger in size there.
Cheers